Using PlanetScale with Bref on AWS Lambda
PlanetScale (opens in a new tab) is a hosted serverless MySQL database based on the Vitess engine (learn more (opens in a new tab)).
Amongst other features, it offers the following benefits compared to running a database on AWS:
- Simple to set up: no VPC (virtual private network) to set up, no instances to configure.
- Runs the Vitess clustering system (opens in a new tab), which offers great scalability and supports a lot more concurrent connections via built-in connection pooling (opens in a new tab).
- Since it does not require a VPC, we do not need to set up and pay for a NAT Gateway.
One extra feature worth mentioning is the branching concept (opens in a new tab): it enables testing schema changes before deploying them in production without downtime.
Plans (opens in a new tab) start at $5/month for single-node PostgreSQL databases.
Getting started
To use PlanetScale with Bref, start by creating a PlanetScale account (opens in a new tab).
Then, create a database in the same region as your Bref application.
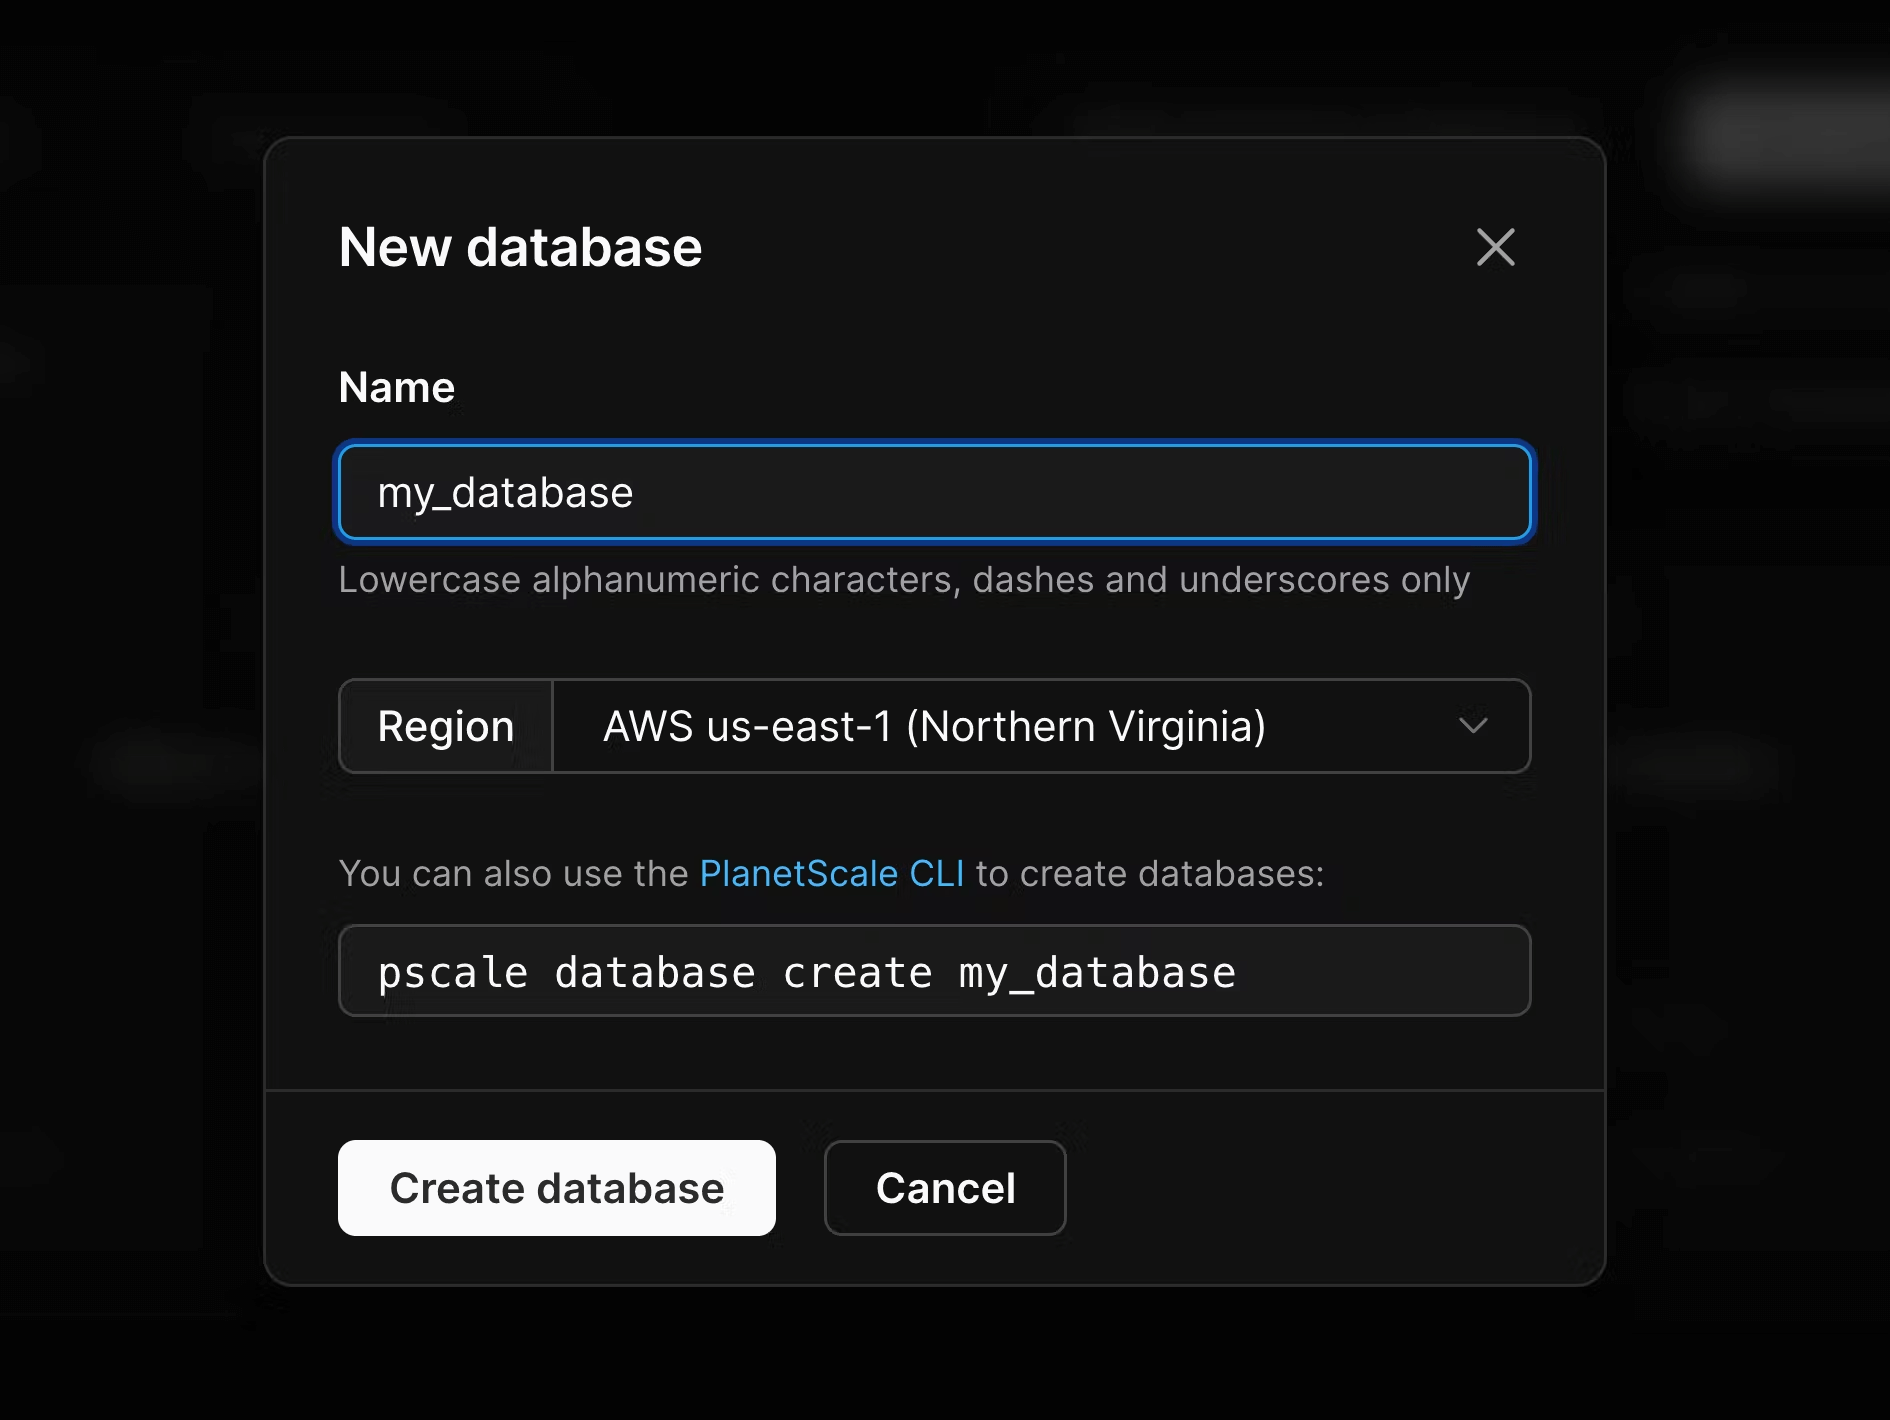
The database is created with an initial development branch: main. PlanetScale has a branching concept (opens in a new tab) that lets you test schema changes in a development branch, then promote it to production, or even create new branches (isolated copies of the production schema) off of production to use for development.
You can now click the Connect button and select "Connect with: PHP (PDO)". That will let you retrieve the host, database name, user and password.
Here is a simple example that connects to the database using PDO and performs a few queries:
<?php
$host = '<host>';
$dbname = '<database name>';
$user = '<user>';
$password = '<password>';

$pdo = new PDO("mysql:host=$host;dbname=$dbname", $user, $password, [
    PDO::MYSQL_ATTR_SSL_CA => openssl_get_cert_locations()['default_cert_file'],
]);

$pdo->exec('CREATE TABLE IF NOT EXISTS test (id INT NOT NULL AUTO_INCREMENT, name VARCHAR(255) NOT NULL, PRIMARY KEY (id))');
$pdo->exec('INSERT INTO test (name) VALUES ("test")');
var_dump($pdo->query('SELECT * FROM test')->fetchAll());
Note the PDO::MYSQL_ATTR_SSL_CA flag: while we connect via a username and password, the connection happens over SSL (opens in a new tab) to secure against man-in-the-middle attacks. To avoid hardcoding the location of the file containing SSL certificates, we retrieve its path via openssl_get_cert_locations()['default_cert_file'].
In Bref, the file is located here: /opt/bref/ssl/cert.pem.
Laravel
This guide assumes you have already set up a Laravel application by following the Bref documentation for Laravel.
To configure Laravel to use the PlanetScale database, you need to set it up via environment variables.
If you deploy a .env file, set up the following variables:
DB_CONNECTION=mysql
DB_HOST=<host url>
DB_PORT=3306
DB_DATABASE=<database name>
DB_USERNAME=<user>
DB_PASSWORD=<password>
# Connect via SSL (https://planetscale.com/docs/concepts/secure-connections)
MYSQL_ATTR_SSL_CA=/opt/bref/ssl/cert.pem
If you don't deploy the .env file, you can configure the variables in serverless.yml:
provider:
    # ...
    environment:
        DB_HOST: <host url>
        DB_DATABASE: <database name>
        DB_USERNAME: <user>
        DB_PASSWORD: ${ssm:/my-app/database-password}
        # Connect via SSL (https://planetscale.com/docs/concepts/secure-connections)
        MYSQL_ATTR_SSL_CA: /opt/bref/ssl/cert.pem
Note that the DB_PASSWORD value is sensitive and can be set up as a secret via SSM. Read about Secret variables to learn more.
Don't forget to deploy the changes:
serverless deployNow that Laravel is configured, you can run php artisan migrate in AWS Lambda to set up our tables:
serverless bref:cli --args="migrate --force"Note: PlanetScale does not support foreign key constraints. If your application uses foreign key constraints, you will have to remove them before running php artisan migrate. See the MySQL compatibility section for more information.
That's it! Our database is ready to use.
Symfony
This guide assumes you have already set up a Symfony application by following the Bref documentation for Symfony.
First, make sure you have installed Doctrine, or follow these docs to do so (opens in a new tab).
To configure Symfony to use the PlanetScale database, you need to set it up via environment variables.
If you deploy a .env file, set up the following variables:
DATABASE_URL="mysql://<USERNAME>:<PASSWORD>@<HOST_URL>:3306/<DATABASE_NAME>?serverVersion=8.0"If you don't deploy the .env file, you can configure the variables in serverless.yml:
provider:
    # ...
    environment:
        DATABASE_URL: ${ssm:/my-app/database-url}
Note that the DATABASE_URL value is sensitive and can be set up as a secret via SSM. Read about Secret variables to learn more.
Finally, edit the config/packages/doctrine.yaml configuration file to set up the SSL connections (opens in a new tab):
doctrine:
    dbal:
        url: '%env(resolve:DATABASE_URL)%'
        options:
            # Connect to the database via SSL
            !php/const PDO::MYSQL_ATTR_SSL_CA: /opt/bref/ssl/cert.pem

# ...
Let's deploy the changes:
serverless deployNow that Symfony is configured, you can run the bin/console doctrine:migrations:migrate command in AWS Lambda to set up our tables:
serverless bref:cli --args="doctrine:migrations:migrate"Note: PlanetScale does not support foreign key constraints. If your application uses foreign key constraints, you will have to remove them before running your migrations. See the MySQL compatibility section for more information.
That's it! Our database is ready to use.
MySQL compatibility
PlanetScale is based on the Vitess clustering system, which was built for scaling MySQL. Because of that, Vitess doesn't support all MySQL features.
The biggest change is that foreign key constraints are not supported. To be clear, it is possible to have references between rows of different tables and perform joins. But constraints are not enforced: foreign keys are no longer validated at the database level, and you cannot use ON DELETE ... statements.
That means that you should take care of validating references between rows and handle cascade deletions. If you use an ORM, you should be in a good place:
- Laravel DB migrations and Eloquent work fine. You can use the
foreignId()method (opens in a new tab) to create relationships between tables, but you cannot enforce referential integrity with theconstrained()method (and related methods likeonDelete('cascade')). - Doctrine (opens in a new tab) works fine, but you should not use
onDelete="CASCADE"which relies on foreign key constraints (opens in a new tab) (cascade=REMOVEorcascade=ALLis fine Doctrine performs the cascade in memory via PHP).
You can read the complete MySQL compatibility table on the PlanetScale website (opens in a new tab).
Database import
PlanetScale provides an automated import tool to import an existing database without downtime. Check out the documentation (opens in a new tab) to get started.
For simple scenarios, you can also use the mysqldump tool (opens in a new tab) to export your existing database and import it later in PlanetScale. Note that there are specific options you need to use for Vitess (opens in a new tab). You also need to export the schema and the data separately because you will need to remove foreign key constraints from the schema.
Let's first export the schema and the data:
mysqldump -u <user> -p<password> -h <hostname> --set-gtid-purged=OFF --no-tablespaces --no-data <db-name> > schema.sql
mysqldump -u <user> -p<password> -h <hostname> --set-gtid-purged=OFF --no-tablespaces --no-create-info <db-name> > data.sql
Next, edit schema.sql to remove all foreign key constraints (learn more (opens in a new tab)), for example:
CREATE TABLE products (
  id INT NOT NULL,
  category_id INT,
  PRIMARY KEY (id),
- KEY category_id_idx (category_id),
- CONSTRAINT `category_fk` FOREIGN KEY (category_id) REFERENCES category(id)
+ KEY category_id_idx (category_id)
);
(watch out for the trailing comma, else you might get errors like "You have an error in your SQL syntax")
Finally, you can import the schema.sql and data.sql into PlanetScale, using the PlanetScale settings this time (user, password, host):
mysql -u <user> -p<password> -h <hostname> <db-name> < schema.sql
mysql -u <user> -p<password> -h <hostname> <db-name> < data.sql
Schema changes workflow
PlanetScale has a concept of database branches (opens in a new tab):
- Development branches (opens in a new tab) are isolated copies of your production database and are used to test schema changes in development.
- Production branches (opens in a new tab) are high availability branches intended for production traffic. They are protected from direct DDL, so you cannot perform direct schema changes on production branches.
You can set up production branches in two ways:
- either allow running DB migrations directly on your production database,
- or forbid direct schema changes in production by enabling Safe Migrations (opens in a new tab).
Without "Safe Migrations"
If the production branch has the "Safe Migrations" feature disabled, you can run DB migrations on the production database as part of your deployment.
This strategy implies either:
- accepting downtime on deployment, for example by using Laravel's maintenance mode (put the app offline, deploy, run migrations, then put the app back online)
- or always writing backward-compatible DB migrations
This option works well for applications with low traffic or in early development. For high-traffic applications, using "Safe Migrations" is recommended instead.
With "Safe Migrations"
If the production branch has the "Safe Migrations" feature enabled, you need to use development branches and deploy requests. Below is an introduction to these features.
You start with a development branch called main, which lets you set up your schema. Once set up, you can promote (opens in a new tab) that branch (or any other branch) to a production branch with "Safe Migrations" enabled.
Later, you can apply schema changes (aka DB migrations) to the production database without downtime:
- In PlanetScale, create a new development branch off of the production branch. This is an isolated copy of the production schema that you can freely play around with.
- Set up a dev environment of your application.
- Run the DB migrations in the dev branch.
- Test the changes in the dev environment.
- In PlanetScale, deploy the DB changes to the production branch via a "deploy request".
Let's dive through these steps in the next section.
Deploying DB migrations in detail
PlanetScale works with branches, which matches with the concept of stages in Serverless Framework.
To deploy DB migrations in production, you can work with two environments:
- A production environment: our application deployed in the
prodstage and configured to use theproductionPlanetScale branch. - A dev environment: our application deployed in the
devstage and configured to use thedevelopmentPlanetScale branch.
You can deploy our applications to different stages via the --stage option. Each stage is completely isolated from the others.
# Deploy the "dev" environment:
serverless deploy

# Deploy the "prod" environment:
serverless deploy --stage=prod
You want each "stage" of our application to connect to a different PlanetScale branch. You can achieve that in serverless.yml via stage parameters (opens in a new tab):
provider:
    # ...
    environment:
        # ...
        DB_HOST: <host url>
        DB_DATABASE: <database name>
        DB_USERNAME: ${param:db-user}
        DB_PASSWORD: ${param:db-password}

params:
    # These values apply for all stages by default
    default:
        # Connect to the "development" database in PlanetScale
        db-user: <user-for-dev-branch>
        db-password: ${ssm:/my-app/dev/db-password}
    # These values apply for the `prod` stage only
    prod:
        # Connect to the "production" database in PlanetScale
        db-user: <user-for-prod-branch>
        db-password: ${ssm:/my-app/prod/db-password}
In the example above, the DB_USERNAME and DB_PASSWORD environment variables will have different values based on the stage.
The next step is to create the development branch off of the production branch (opens in a new tab). This branch will be an isolated copy of the production schema.
Now that the environments are set up, you can apply the following workflow for DB migrations:
-
Deploy your code changes and migrations in the development stage.
-
Apply DB migrations in the development environment (drop a column, add a table, etc.):
- If you use Laravel, run DB migrations via the
artisanfunction:serverless bref:cli --stage=dev --args="migrate" - If you use Symfony, run DB migrations via the
consolefunction:serverless bref:cli --stage=dev --args="doctrine:migrations:migrate" - If you don't use any framework, run DB queries via the
pscaleCLI (opens in a new tab).
- If you use Laravel, run DB migrations via the
-
Test changes in the development environment to make sure everything works correctly.
-
Create a deploy request.
PlanetScale will create a schema diff that you can review before applying. It will also validate the diff and detect schema issues like missing unique keys, etc.
Once reviewed and approved, you can add it to the deploy queue and PlanetScale will begin the deployment.
The schema changes are deployed without downtime: no table gets locked, and production is not slowed down during the migration. This is what is called "non-blocking schema changes (opens in a new tab)".
The migrations are now applied to production.
When to apply migrations?
Depending on the schema change, you might want to apply DB migrations before or after a code deployment:
- Add a column/table: apply the migration before deploying the code.
- Remove a column/table: apply the migration after deploying the code.
- Rename a column/table: this scenario is more complex and needs to be addressed in two steps:
- Apply migrations that add the column/table (it will be duplicated).
- Deploy code changes to write new data to the new column/table, and read from both.
- Run a script that copies the old data to the new column/table.
- Deploy code changes to only read and write to the new column/table.
- Apply migrations that remove the old column/table.
If you use Laravel, you can read a complete blog post about this topic: Zero downtime Laravel migrations (opens in a new tab).